SqueezeBrains SDK 1.13
Tutorials

There are some simple tutorials to show how to use the SB library.

The tutorials are not installed by default but they must be explicitally selected during the installation procedure. The tutorials folder is named "sb_tutorials" and it is located inside the installation folder of the specific SB Library version. In case the tutorials are not installed, please follow these instructions in order to install them:

  • Launch the SB_Maintenance_Tool located inside the installation folder of the SB library.
  • Choose the first option "Add or remove components" and click on "Next".
  • In the "Components" Window expand the node of the installed version, check the "C/C++ Tutorials" or the "C# Tutorials" option and then click on "Next".
  • When the Update procedure is completed the folder "sb_tutorials" should be created.

C/C++

The C/C++ tutorials have been organized to make it easier to understand the integration of the SB library into your system. There are two ways you can integrate the SB library into your system:

  • Minimal integration:
    • develop code for images elaboration
    • use SB GUI for training
  • Full integration:
    • develop code for images elaboration
    • develop your own GUI for training

Obviously this is a simplification and between the minimum and the complete integration there are a series of intermediate integrations.
The tutorials are written in "C" and you can test them both on Windows and on Linux operative system.
You can run all the tutorials because, in their folders, there are all the data they need, both images and projects.
SB SDK includes some projects already configured to run in two different IDEs: Microsoft Visual Studio and Qt Creator.

  • Microsoft Visual Studio
    • Only for Windows
    • Solution file: SqueezeBrainsTutorials.sln
      If you have installed the SB SDK in the default folder, you will find the solution in the folder C:/Program Files/SqueezeBrains/1.13/sb_tutorials/C++.
    • Version used to create the solution: Visual Studio Community 2019 ver. 16.10.3
    • See Appendix 1: manage tutorials with older version of Visual Studio Community for compatibility with previous version of Visual Studio.
  • Qt Creator

    • Version used to create the project: Qt creator 4.14.1 and Qt 5.15.0
    • Windows
      • Project file: SqueezeBrainsTutorials.pro
        If you have installed the SB SDK in the default folder, you will find the solution in the folder C:/Program Files/SqueezeBrains/1.13/sb_tutorials/C++.
        If you have installed the SB SDK in the "Program Files" folder, you have to start QT Creator as Administrator.
    • Linux
      • Project file: SqueezeBrainsTutorials.pro
        If you have installed the SB SDK in the default folder, you will find the solution in the folder "/opt/SqueezeBrains/1.13/sb_tutorials/C++".
      • To install Qt Creator on a Ubuntu, Debian and Mint distributions open a terminal and in superuser mode run the following commands:
        • apt-get upgrade
        • apt-get install cmake
        • apt-get install qt5-default
        • apt-get install qtcreator
      • See Appendix 2: configure tutorials to use SB Deep Learning Framework with Qt Creator in Linux to configure deep learning tutorials with Qt Creator in Linux OS.

    When you open the project SqueezeBrainsTutorials.pro for the first time, Qt Creator asks you to configure the project.
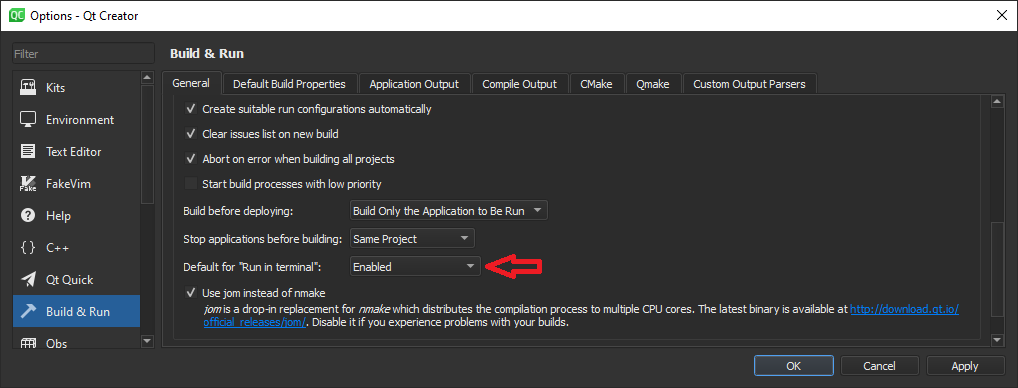
    Before running the configuration set the value Default for "Run in Terminal" to Enabled: open "Manage Kits..." and then "Build & Run" as shown in the image below.

    Default for Run in Terminal

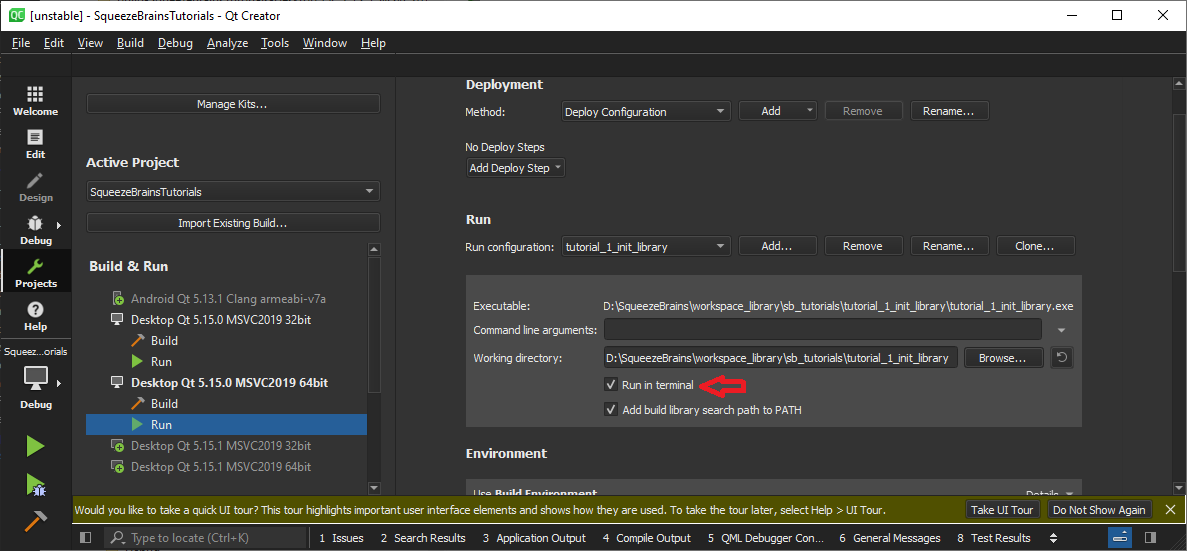
    If you have an older version of Qt you probably don't have this option in "Build & Run". Then you have to configure the property "Run in terminal" of each project as shown in the image below.

    Run in Terminal
Attention
To run the tutorials you need a license. See License for more information.
  • Demo license: you should copy the license file sb.lic, attached to the email, in the folder where SqueezeBrainsTutorials.sln and SqueezeBrainsTutorials.pro are.
  • Master license: you have to apply the v2c file to the USB dongle key, and connect it to an usb port of your PC.

Common

  1. tutorial_1_init_library: how to initialize the library
  2. tutorial_2_master_license_request: how to request a software "master" license for the purchase.
  3. tutorial_11_check_license_configuration: how to check the compatibility of the project with a license configuration.

Minimal integration

Retina

With minimal integration of SB library you will only integrate the code to elaborate images and you will use the SB GUI to create the project, label the images and execute the training (SVL).
In this section you will find some tutorials that explain to you the following procedures:

  1. tutorial_3_retina_detect: how to elaborate images
  2. tutorial_7_retina_multi_project: how to use more than one project to detect objects
  3. tutorial_8_retina_set_roi: how to set a ROI in the SB_IMAGE_INFO_EXT file associated with an image

Surface

With minimal integration of SB library you will only integrate the code to elaborate images and you will use the SB GUI to create the project, label the images and execute a training (SVL).
In this section you will find a tutorial that explain to you:

  1. tutorial_9_surface_detect: how to elaborate images

Deep Cortex

With minimal integration of SB library you will only integrate the code to elaborate images and you will use the SB GUI to create the project, label the images and execute a training (SVL).
In this section you will find a tutorial that explain to you:

  1. tutorial_12_deep_cortex_detect: how to elaborate images

Deep Surface

With minimal integration of SB library you will only integrate the code to elaborate images and you will use the SB GUI to create the project, label the images and execute a training (SVL).
In this section you will find a tutorial that explain to you:

  1. tutorial_14_deep_surface_detect: how to elaborate images

Full integration

With full integration of SB library, in addition to writing the code to elaborate images, you can integrate in your system what the SB GUI does:

  • create a new project
  • add and configure a model in a project
  • label the images, i.e. add samples, in case of Retina and Deep Cortex, or add defects ROI, in case of Surface and Deep Surface.
  • execute a training, i.e. SVL

Retina

In this section you will find some tutorials that explain to you:

  1. tutorial_4_retina_svl_simple: how to create a project, set samples and execute the training (SVL)
  2. tutorial_5_retina_svl_custom_elaboration: how to execute the training and detection with custom elaboration of the image
  3. tutorial_6_retina_svl_project: how to execute the training of an existing project

Surface

In this section you will find some tutorials that explain to you:

  1. tutorial_10_surface_svl_simple: how to create a project, set ROI of defects and execute the training (SVL)

Deep Cortex

In this section you will find some tutorials that explain to you:

  1. tutorial_13_deep_cortex_svl_simple: how to create a project, assign a model to images and execute the training (SVL)

Deep Surface

In this section you will find some tutorials that explain to you:

  1. tutorial_15_deep_surface_svl_simple: how to create a project, set ROI of defects from images with labeling and execute the training (SVL)

Appendix 1: manage tutorials with older version of Visual Studio Community

If you have an older version of Visual Studio Community, in order to compile the tutorials correctly, you should set, for each project, the correct "Target Platform", "Windows SDK Version" and "Platform toolset" in the project properties as shown in the image below. Remenber to change it for all Configurations and all Platforms.

project property pages

Appendix 2: configure tutorials to use SB Deep Learning Framework with Qt Creator in Linux

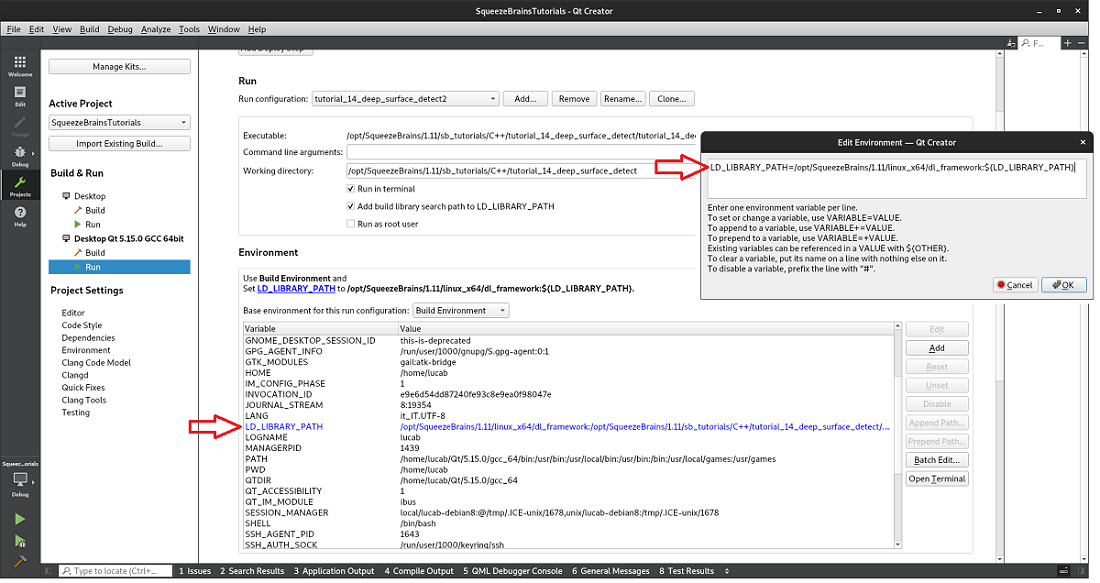
The configuration of Deep Cortex and Deep Surface tutorials requires an additional explaination for Linux OS. To run these tutorials, the user have to:

  1. install the SB Deep Learning Framework
  2. export the path of the "dl_framework" folder in the enviroment variables used by the program at runtime. In Windows this step is directly performed by passing the path as argument to sb_init_dl function.

The first step is quite intuitive, instead for the second one proceed as follows.
For the project you want to run, select the current "Kit" and open "Run Setting". In "Run Enviroment" panel click on "Batch Edit" and edit the enviroment variable LD_LIBRARY_PATH appending the path of the "dl_framework" folder as follows: LD_LIBRARY_PATH=/opt/SqueezeBrains/1.13/linux_x64/dl_framework:${LD_LIBRARY_PATH}.

Qt Creator configuration of SB Deep Learning Framework

C#

The C# .NET tutorials have been organized to make it easier to understand the integration of the SB library into your system. There are two ways you can integrate the SB library into your system:

  • Minimal integration:
    • develop code for images elaboration
    • use SB GUI for training
  • Full integration:
    • develop code for images elaboration
    • develop yor own GUI for training

Obviously this is a simplification and between the minimum and the complete integration there is a series of intermediate integrations.
The C# Tutorials cover only the Minimal Integration as the C# Wrapper at the moment is limited to the detection and not to the training.

The tutorials are written in C# and you can test them on Windows Operative System.
You can run all the tutorials because, in their folders, there are all the data they need, both images and projects.
SB SDK includes some projects already configured to run in the Microsoft Visual Studio IDE.

  • Microsoft Visual Studio
    • Only for Windows
    • Solution file: SqueezeBrainsTutorialsCs.sln
      If you have installed the SB SDK in the default folder, you will find the solution in the folder C:/Program Files/SqueezeBrains/1.13/sb_tutorials/C#.
    • Version used to create the solution: Community 2019 ver. 16.10.3 .NET Framework 4.7.2
    • See Appendix 1: manage tutorials with older version of Visual Studio Community for compatibility with previuos version of Visual Studio.
Attention
To run the tutorials you need a license. See License for more information.
  • Demo license: you should copy the license file sb.lic, attached to the email, in the folder where SqueezeBrainsTutorialsCs.sln is.
  • Master license: you have to apply the v2c file to the USB dongle key, and connect it to an USB port of your PC.

Common

  1. Tutorial_1_InitLibrary: how to initialize the library
  2. Tutorial_11_CheckLicenseConfiguration: how to check the compatibility of the project with a license configuration.

Minimal integration

Retina

With minimal integration of SB library you will only integrate the code to elaborate images and you will use the SB GUI to create the project, label the images and execute the training (SVL).
In this section you will find some tutorials that explain to you the following procedures:

  1. Tutorial_3_RetinaDetect: how to elaborate images
  2. Tutorial_7_RetinaMultiProject: how to use more than one project to detect objects

Surface

With minimal integration of SB library you will only integrate the code to elaborate images and you will use the SB GUI to create the project, label the images and execute a training (SVL).
In this section you will find a tutorial that explain to you:

  1. Tutorial_9_SurfaceDetect: how to elaborate images

Deep Cortex

With minimal integration of SB library you will only integrate the code to elaborate images and you will use the SB GUI to create the project, label the images and execute a training (SVL).
In this section you will find a tutorial that explain to you:

  1. Tutorial_12_DeepCortexDetect: how to elaborate images

Deep Surface

With minimal integration of SB library you will only integrate the code to elaborate images and you will use the SB GUI to create the project, label the images and execute a training (SVL).
In this section you will find a tutorial that explain to you:

  1. Tutorial_14_DeepSurfaceDetect: how to elaborate images